


Learn what Ghee is, how to use Ghee in your kitchen, and how to save money by making a large batch at home with our step-by-step tutorial!

WHAT IS GHEE?
Ghee, also called Clarified Butter, is butter that is simmered until the oil and milk solids separate, and the liquid fat has turned a golden color. It is then strained.
The quality, color, and taste of your finished Ghee is only as good as the butter you start with so I highly recommend investing in some good quality butter. And, YES, you can use salted butter to make Ghee. Some people even add a bit of spice while it is simmering (turmeric is common).
The milk solids (which are strained) contain the casein and whey protein, which for a lot of people, is what causes dairy sensitivities and digestion issues.
So, in short – Ghee is butter oil.
Ghee is an ancient food that originated in India and is commonly used in Indian, Middle Eastern, and Southeast Asian cuisines. In many cultures, it’s also used medicinally.
It’s also Whole30 compliant and has a tasty nutty flavor. Plus, a very high smoke point (450F) so it can be used for high-heat cooking without burning!
HOW TO MAKE GHEE
- Begin by cubing the butter. Add to a large pot set over medium-low heat.
- Once butter is completely melted and begins to bubble, very slightly lower the heat. You want a steady bubble but not so much that the butter is splattering out of the pot or spraying on the stove.
- Simmer for 25 to 30 minutes or until the milk protein has completely separated and there is both a layer on the top of the butter as well as some on the bottom of the pot.
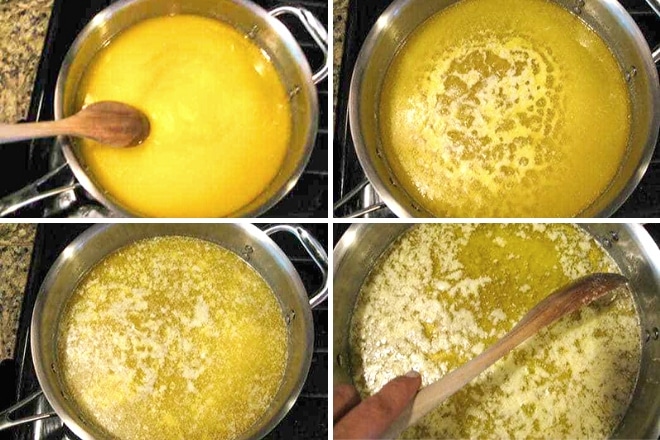
- Begin carefully skimming the top layer off until the Ghee looks clean (except for bits on the bottom). Discard.
- Slightly raise the heat to medium-low and continue simmering for an additional 5 to 10 minutes until most of the bubbling stops and the milk protein bits on the bottom of the pot begin to brown. Do not let them burn! Immediately remove the Ghee from the stovetop and set somewhere to cool.
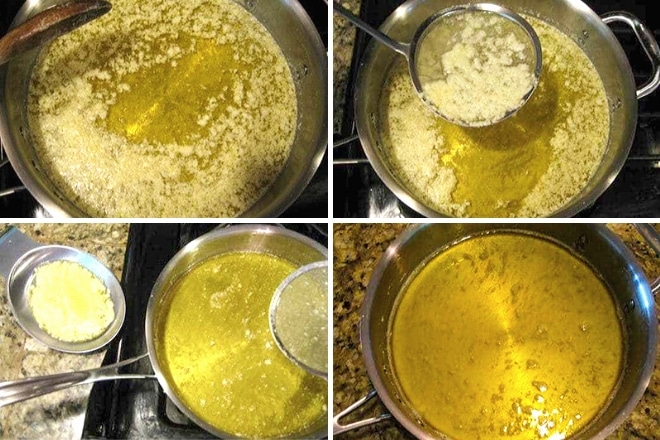
- Once cool, strain through a fine-mesh strainer or cheesecloth. Discard the toasted bits from the bottom of the pan.
- That’s it. I included a lot of pictures because while it sounds simple, it took me a couple of tries to get it perfect and I thought for this one, more info was better. Enjoy!


TOOLS TO MAKE GHEE
- Soup pot, stockpot, or Dutch oven
- Skimmer
- Fine mesh strainer or cheesecloth for straining
- Mason jar or other glass jars with lids for storage
TIPS
- Traditionally, Ghee is made from unsalted butter. While I have made it from both salted and unsalted and do prefer unsalted, I have been making salted most recently because Costco has a great deal on grass-fed Kerrygold butter but only the salted. To me, the quality of the butter is more important than if it is salted or not. Bottom Line: Get the best quality butter you can – preferably local and pastured but at a minimum pastured and free of antibiotics and hormones.
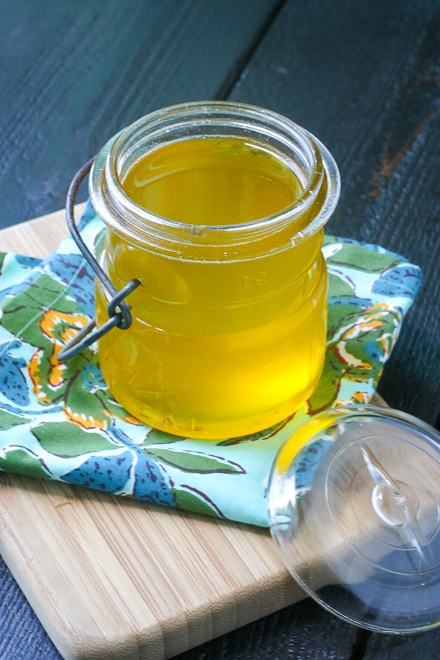
- The Ghee in my main photos was still a bit warm so completely liquid. Ghee will stay semi-soft and slightly liquid at temperatures above 62F. It is liquid when warm and becomes more solid as it cools. As a general rule, I keep the jar of Ghee I am currently using in my pantry and cook with it from there. I store the remaining jars in the back of my refrigerator until ready to use.
- If this is your first time making Ghee, I recommend sticking with just 1 pound of butter as it is easier to manage. Once you get the hang of it, double or triple the recipe and then store the additional jars in the back of your fridge until ready to use.
- Use a pot large enough to prevent splatters. As the butter cooked, it bubbles and can splatter as you figure out the perfect temperature for your stove-top (electric and gas can vary). I use a wide-bottomed soup or stockpot or dutch oven.

RECIPES THAT USE GHEE
You can use Ghee in any recipe that calls for butter. If you want to use Ghee for baking, I recommend refrigerating it first so it becomes a solid.
Some recipe ideas that use Ghee are:
- Paleo Cauliflower Mash (Whole30 compliant)
- Strawberry Scones (use Ghee in place of Butter)
- Paleo Chicken Pot Pie (use refrigerated Ghee to make pot pie crust)
- Healthy Sweet Potato Casserole (use Ghee to add butter flavor to casserole)
- Crispy Home Fries (saute potatoes in Ghee instead of avocado oil)
- Paleo Salmon Cakes (use Ghee to add flavor to salmon cakes as you pan fry them)
This is just the beginning as far as recipe ideas go – Ghee works in recipes for all seasons, so learning how to make ghee at home will be a powerful tool in your cooking arsenal. I can’t wait to hear how it turns out for you – be sure to come back and let me know!
Did you make this recipe? Please give it a star rating below!
Learn what Ghee is, how to use Ghee in your kitchen, and how to save money by making a large batch at home with our step-by-step tutorial!

- 1 pound pastured butter cut into evenly sized pieces
-
Heat a wide-bottomed pot with high sides (for splashing/bubbling) over medium-low heat. Once hot, add cubed butter.
-
Use a wooden spoon or spatula to stir the butter and speed along the melting process.
-
Once butter is completely melted and begins to bubble, very slightly lower the light. You want a steady bubble but not so much that butter is jumping out of the pan or spraying on the stove top.
Cook for 25 to 30 minutes or until the milk protein has completely separated and there is a layer on the top and bits on the bottom of the pan.
-
Begin carefully skimming the top layer off until Ghee looks clean (except for bits on the very bottom) and discard.
-
Slightly raise the heat back up to medium low and continue cooking another 5 to 10 minutes until most of the bubbling stops and the milk protein bits on the bottom of the pan begin to brown.
Do not let them burn! Immediately remove the Ghee from the stove top and set somewhere to cool.
-
Once cool, strain through a fine mesh strainer or cheesecloth. Discard the toasted bits from the bottom of the pan.
Store Ghee at room temperature in a glass container or mason jar and use as needed.
- Traditionally, Ghee is made from unsalted butter. While I have made it from both salted and unsalted and do prefer unsalted, I have been making salted most recently because Costco has a great deal on grass-fed Kerrygold butter but only the salted. To me, the quality of the butter is more important than if it is salted or not. Bottom Line: Get the best quality butter you can - preferably local and pastured but at a minimum pastured and free of antibiotics and hormones.
- The Ghee in my main photos was still a bit warm so completely liquid. Ghee will stay semi-soft and slightly liquid at temperatures above 62F. It is liquid when warm and becomes more solid as it cools. As a general rule, I keep the jar of Ghee I am currently using in my pantry and cook with it from there. I store the remaining jars in the back of my refrigerator until ready to use.
- If this is your first time making Ghee, I recommend sticking with just 1 pound of butter as it is easier to manage. Once you get the hang of it, double or triple the recipe and then store the additional jars in the back of your fridge until ready to use.
- Use a pot large enough to prevent splatters. As the butter cooked, it bubbles and can splatter as you figure out the perfect temperature for your stove-top (electric and gas can vary). I use a wide-bottomed soup or stockpot or dutch oven.
Did you make this recipe? Tag @EverydayMaven on Instagram with the hashtag #EveryDayMaven and please give a star rating below.
UPDATE NOTES: Please note that this recipe was originally published in April 2014. It was updated in December 2019 with additional text, edited photos, and more recipe ideas.


A caveat: Eat it if you can tolerate it. The residue at the bottom is the protein casein (the foam on the top is whey protein). Casein structurally similar to gluten, and many people who are celiac or gluten sensitive are also highly sensitive to casein, soy protein too, because it is also structurally very similar. For my celiac/gluten-sensitive family, it is pure poison. We chuck it.
We don’t eat it either Rose but for those that can – enjoy it! 🙂
Hi. Thanks for the recipe. One more thing … you don’t need to discard the brown residue. It is really tasty. Just add some sugar to it and you have a tasty snack for a kid. It was my favorite sweet dish when I was a kid 🙂
Hi Alyssa, I made this and the next day it was very grainy in texture. I will still use it, but it’s not that smooth ghee texture I love. Where did I go wrong???
Hi Rachel,
This happens to me to sometimes. I have noticed it more when I use salted butter vs. unsalted and if my kitchen is super hot while it cools. Here is a FAQ from Pure Foods Ghee that also addresses it. I don’t think you went wrong anywhere and the Ghee is totally fine to use!
I got my strainers at Walmart.
Another good reason to use unsalted butter is the formation of 3-MCPD and other process contaminants. When heating oils with salt this happens quite readily, and by using unsalted butter you avoid this problem.
Thanks for the link!
Bonnie
p.s. I am working with a nutritionist who is recommending ghee as I am not absorbing fats and in this form they are absorbed easier. When you’re not absorbing fats properly your energy is low which can affect other things as well.
I hope it works out for you Bonnie!
My local home store does not have a fine mesh skimmer. Where did you get yours?
Thanks!
Bonnie
Hi Bonnie,
I don’t remember where I got mine – it might have been a kitchen supply store. Amazon has them here if that helps!
I’ve made this last night, left it on the counter, and this morning was looking solid. I’m guessing it doesn’t stay in the liquid form like canola or sunflower oil.
Hi Caron,
No, it doesn’t stay liquid (unless it’s SUPER hot!). It’s fine to use either way and I keep mine out on the counter and not refrigerated. Have a great day 🙂