
Learn how to brew Kombucha at home with this easy step-by-step tutorial! Save a ton of money and create all your favorite flavors!

Kombucha wasn’t something I instantly fell in love with but when I did fall, I fell hard.
Initially, I wasn’t crazy about the slightly sour and fizzy taste. Maybe I just tried the wrong brands or wrong flavors? But I kept trying different ones and then something snapped for me.
I became hooked on GT’s Synergy – specifically Trilogy, Cosmic Cranberry and Gingerberry. One of the reasons I love those three so much is that they are super low in sugar – either 2 grams or 4 grams per serving (2 servings per bottle).
Now, while I clearly love the GT’s, they are really pricey. Where I live one bottle is somewhere between $3.29 and $3.59 each and it was quickly becoming an expensive habit.
This is where Hannah from Blue Kale Road comes in. One day while we were having coffee, she casually mentioned that she homebrews her own Kombucha. I nearly fell over from excitement because I was really interested in learning but it just seemed so overwhelming to me and I had no idea where to get a SCOBY. Hannah told me you can usually get them at Farmer’s Markets (at least here in Seattle), some health food stores and I’ve since found out you can even get them online!
The way I remember it I practically begged her to give me a hands-on lesson and lucky for me, Hannah agreed! Fast forward a couple of weeks and Hannah came over my house (after sending me a list of what I needed) and taught me how to homebrew Kombucha. And you know what? It wasn’t hard AT ALL.
I really psyched myself out for no reason and I am thinking a lot of you might be doing the same so today I am sharing a tutorial for how to get started to make your own Kombucha!
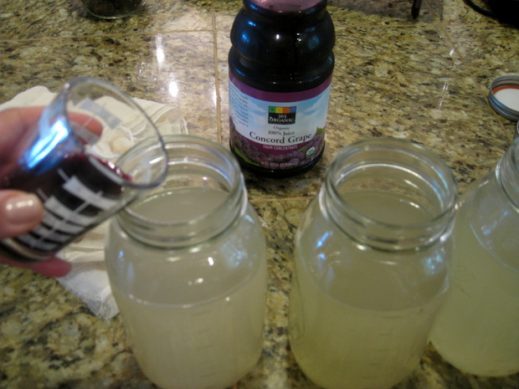
Oh, and it’s important to note that I was in Canada a couple of weeks ago and tried a GT’s Synergy called Divine Grape that was by far and away my absolute favorite Kombucha I’ve ever tasted. It reminded me of a lightly flavored fizzy grape soda. I think I had at least one a day while in B.C. but I haven’t seen it anywhere in Seattle so when I put this last batch of Kombucha in to its second fermentation, I naturally made it Concord Grape. It’s delicious!
NOTES:
- I snapped all the in-process pictures at my house but the two main photos are from my friend Pamela of BOLIG PHOTOGRAPHY. I brought some of my precious Concord Grape Kombucha to Pam’s last week for our photo lessons and it wound up in front of the camera. Not an easy subject but Pam made it look beautiful (of course!) and I learned a lot about photographing beverages!
- I used Organic Sencha tea per Hannah’s suggestion and really love the light, delicate flavor of the finished Kombucha. My next experiment is going to be Yerba Mate but I know others who use different varieties of green tea and of course, black teas.

Did you make this recipe? Please give it a star rating below!
Learn how to brew Kombucha at home with this easy step-by-step tutorial! Save a ton of money and create all your favorite flavors!

- 3 Tablespoons organic loose leaf tea I used Sencha
- 1 cup organic sugar
- 12 cups filtered water divided
- 1 SCOBY mother
- 1.5 cups plain Kombucha tea
- 4 quart glass jar or larger
- cheesecloth
- rubber band
- candy thermometer
- fine mesh strainer
- straws for testing
-
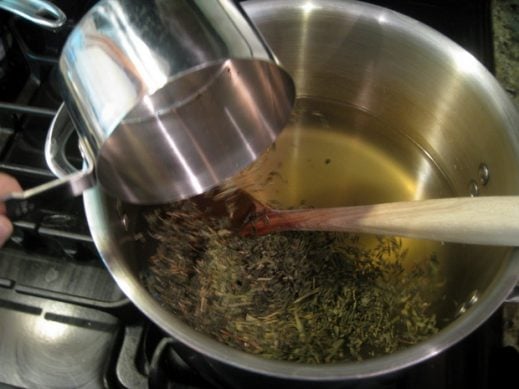
In a saucepan, combine 4 cups of the water with the sugar. Place the candy thermometer in the pot and bring to a low (170F) boil. Stir to completely dissolve the sugar, turn off the light and add the loose tea. Stir and allow to steep for 15 minutes.
-
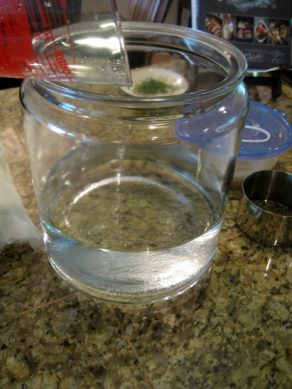
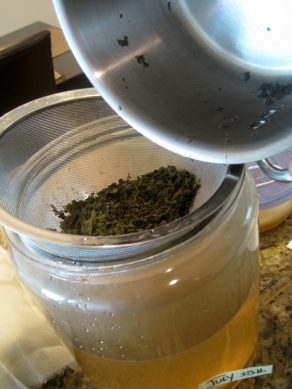
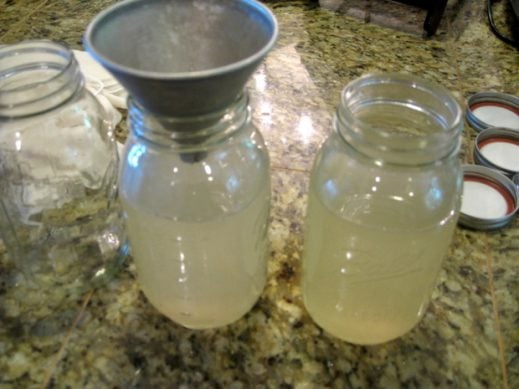
While the tea is steeping, pour the remaining 8 cups of water into your large glass jar. Once the tea is done steeping, place a mesh strainer over the mouth of the jar and pour tea through.
-
Discard tea leaves and place candy thermometer in glass jar. When tea temperature is below 85F (room temp), pour in SCOBY and 1 1/2 cups plain kombucha.
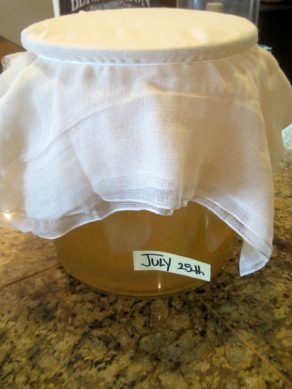
Place cheesecloth over top of jar and secure with a rubber band. Date the jar and set in a warm area (75 to 80F) of your kitchen (or somewhere else in the house).
-
You need to let the tea ferment anywhere from 10 to 14 days depending on how warm the environment is that the tea is left in.
The best way to gauge is to test with a straw (least disruptive to the SCOBY) every other day starting at day 9 or 10.
If the tea still tastes sweet, let it sit. When it begins to taste slightly tart or sour, you can move it to the second fermentation.
My tea was perfect (for me) at day 12 and our kitchen has been very warm (upper 70's, low 80's due to warm Seattle summer and no air-conditioning).


-
Gently remove the SCOBY and 1 1/2 cups of the mature Kombucha to a bowl or measuring cup (or container if not starting a new batch).
*NOTE: This is a good time to reuse the SCOBY and start a new batch*
-
Decant the Kombucha into glass jars that have tightly seal-able lids. Hannah uses beer growlers and I used mason jars for my first batch. I've since been saving all of my GT's Kombucha jars and removing the labels (I wish I would have thought about that before!)
-
I added 1-ounce of Organic 100% Concord Grape Juice (not from concentrate) to every 3 1/2 cups Kombucha. Make sure to top off each glass jar so that you only leave about 1 to 2 ounces of air before sealing. This will help create a nice fizz.
-
Cap the jars or bottles tightly, date them and leave out in the same spot you fermented the tea the first time.
This is the really hard part, waiting around for the Kombucha to get fizzy and flavorful! It took me 6 days and may take you anywhere from 5 to 10 days depending on warmth in the area you are using.
Once it is fizzy enough, move the capped bottles to the fridge to slow down fermentation and Enjoy!


Did you make this recipe? Tag @EverydayMaven on Instagram with the hashtag #EveryDayMaven and please give a star rating below.
KOMBUCHA BREWING TIPS:
- As you continue to brew, a new SCOBY baby may form. Over time it will thicken and you may want to remove the older piece and give to a friend to start their own Kombucha or even have multiple batches going at once. You can also compost or discard it.
- If you want to double the batch (which I have been doing), make sure to double the amount of tea, sugar and amount of mature Kombucha to start with (6 T of tea, 2 Cups Sugar and 3 Cups Mature Kombucha).
- Some Kombucha brewers have alerted me that mason jars may not be good vessels for 2nd fermentation because of the pressure buildup from the carbonation (they can explode apparently). Reusable glass bottles (like the GT’s) with screw-top lids and flip-top cap bottles seem to be very popular and yield good results.
- I had a lot of questions about the SCOBY. “How do I know it’s healthy?” “Is there mold?” “What is the stringy stuff in there?” etc. Instead of badgering Hannah with a million and one questions, i did a bit of research and found the following sites to be the most helpful.
- Kombucha FAQ: http://www.culturesforhealth.com/kombucha-tea-frequently-asked-questions-faq AND http://www.kombuchakamp.com/basic-kombucha-faq
- Continuous Brewing: http://www.culturesforhealth.com/kombucha-continuous-brewing-system
- Kombucha Recipe and Cleaning Tips: http://www.kombuchakamp.com/kombucha-recipe


Can i just take a synergy bottle and pour it in a jar is sugar water and chia seeds?
I have read numerous accounts of people using the Synergy jars successfully and then just as many as them exploding due to the carbonation. I use flip top glass bottles like these that have a deep imprint on the bottom for carbonation and haven’t had an issue.
Hi Alyssa-
This looks great! Quick question, though…
Under Fermentation 1, Step 1, you write,
“Place candy thermometer in the pot and bring to a low (170F) boil. Stir to completely dissolve the sugar, turn off the light and add the loose tea……”
Do you really mean turn off the light? ;o)
I plan on making my own Kombucha very soon. I was just wondering, after it is completed and bottled–how long will it keep under refrigeration? Is it about 30 days–like GT’s? Thanks so much for all the info!!
I’ve never kept any bottled KT longer than 30 days (it goes too fast) and would use GT’s as a guide. Good luck brewing!
I have no registration with Amazon.
No scobie either.
Hi,
I have non dairy kefir – would kefir fermented tea plus juice (for the second ferment) be similar?
Not exactly Heather. I recommend this book – Delicious Probiotic Drinks to get a thorough understanding of the differences and how to make them all!
I also ment to say I love your site. thanks for coming up with it.
Thanks for reading!! 🙂
I came across all this by searching for weight watchers stuff. I to love Kombucha and just can’t afford it all the time. and with being a diabetic I can have it. Wanna come or send me some to TN ? thanks
It’s easy to make once you acquire a SBOBY Zoie! Good Luck with it 🙂
I was so bad and killed my first scoby, lol. I learned from that mistake quickly. I love the blush color of yours…great tips too!
As bizarre as it sounds, the best bottles I’ve used are Budweiser 40 ounce screwtops. I did reuse some GT synergy bottles, but they exploded. When GT had to take their kombucha off the market & reintroduce it after the Lindsey Lohan thing they tweaked the recipe & there’s not as much pressure since what they’re marketing now is as near as kombucha vinegar as you can get. I’d agree with what Leah noted– you must use bottles designed to hold pressure. AND there’s no sense in buying them– unless you check out a homebrew place that sells them for $1 or so & you plan on getting bulk– so keep your screw top wine bottles, screw top or bail top beer bottles, and any bottle that has a bevelled or dimpled bottom– that means it can handle pressure. Champagne bottles are excellent, but sometimes the cork shoots out. I’ve got a 3 part article on my blog Green & Growing that has a mess of details on how to make it fizzier, when you can start drinking, do you need to secondary ferment, etc. I’ve also got lots of recipes & will be updating with some more recipes including Sage & Vanilla, Rhodiola, & one I call Kick Ass because it’s made with lemongrass, ginger, & chilis.
~Jessie
Hi Jessie!
Thank you so much for all the tips and info – it’s great! I have been reading a lot of the 2nd fermentation and wound up going to a home brew store over the weekend and picking up a case of 12 super thick, heavy duty flip-top bottles. I’m going to check out your blog right now 🙂